Mail einrichten - Outlook (macOS)/en
| (5 dazwischenliegende Versionen desselben Benutzers werden nicht angezeigt) | |||
| Zeile 17: | Zeile 17: | ||
* Open Outlook. | * Open Outlook. | ||
===Add account=== | ===Add account=== | ||
| − | [[ | + | [[Datei:Mail-einrichten-outlook-macos-01.png|links|mini|ohne|350px|Settings]] |
<br> | <br> | ||
* Click on '''"Microsoft Outlook"''' in the menu bar. | * Click on '''"Microsoft Outlook"''' in the menu bar. | ||
| Zeile 23: | Zeile 23: | ||
<br clear=all> | <br clear=all> | ||
| − | [[ | + | [[Datei:Mail-einrichten-outlook-macos-02.png|links|mini|ohne|350px|Settings]] |
<br> | <br> | ||
* Click on '''"Accounts"'''. | * Click on '''"Accounts"'''. | ||
<br clear=all> | <br clear=all> | ||
| − | [[ | + | [[Datei:Mail-einrichten-outlook-macos-03.png|links|mini|ohne|350px|Accounts]] |
<br> | <br> | ||
* Click on the <code>+</code> at the bottom. | * Click on the <code>+</code> at the bottom. | ||
| Zeile 36: | Zeile 36: | ||
===Set up an account=== | ===Set up an account=== | ||
<br> | <br> | ||
| − | {{ | + | {{E-Mail-Aliase-en}} |
<bootstrap_accordion> | <bootstrap_accordion> | ||
<bootstrap_panel heading="Outlook Legacy for macOS"> | <bootstrap_panel heading="Outlook Legacy for macOS"> | ||
These instructions refer to the classic design of Outlook on macOS. | These instructions refer to the classic design of Outlook on macOS. | ||
| − | [[ | + | [[Datei:Mail-einrichten-outlook-macos-04.png|links|mini|ohne|350px|Email address]] |
<br> | <br> | ||
* Enter your email address. | * Enter your email address. | ||
| Zeile 47: | Zeile 47: | ||
<br clear=all> | <br clear=all> | ||
| − | [[ | + | [[Datei:Mail-einrichten-outlook-macos-05.png|links|mini|ohne|350px|Email protocol]] |
<br> | <br> | ||
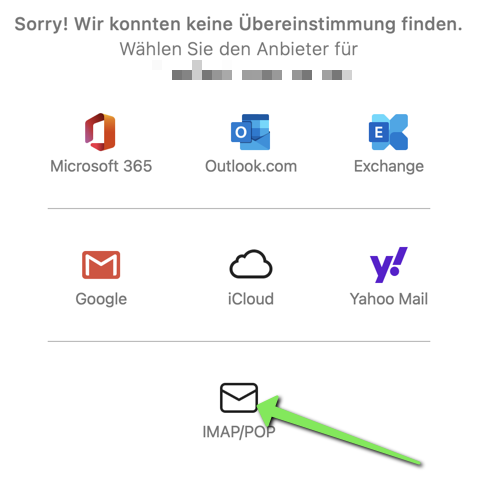
* Click '''"IMAP/POP"'''. | * Click '''"IMAP/POP"'''. | ||
| Zeile 53: | Zeile 53: | ||
Select the following settings: | Select the following settings: | ||
| − | [[ | + | [[Datei:Mail-einrichten-outlook-macos-06.png|links|mini|ohne|350px|E-mail settings]] |
<br> | <br> | ||
* '''Type:''' IMAP | * '''Type:''' IMAP | ||
| Zeile 68: | Zeile 68: | ||
<br clear=all> | <br clear=all> | ||
| − | [[ | + | [[Datei:Mail-einrichten-outlook-macos-07.png|links|mini|ohne|350px|Mailbox successfully added]] |
<br> | <br> | ||
* Your email mailbox has been set up. | * Your email mailbox has been set up. | ||
| Zeile 74: | Zeile 74: | ||
<br clear=all> | <br clear=all> | ||
</bootstrap_panel> | </bootstrap_panel> | ||
| + | |||
| + | <bootstrap_panel heading="New Outlook for macOS"> | ||
| + | For Outlook 16.42 or newer, there is a new design for Outlook. Microsoft calls this ''"New Outlook for macOS"'' | ||
| + | [[Datei:Mail-einrichten-outlook-macos-08.png|links|mini|ohne]] | ||
| + | <br> | ||
| + | * Click '''"Add email account"''' | ||
| + | <br clear=all> | ||
| + | |||
| + | [[Datei:Mail-einrichten-outlook-macos-09.png|links|mini|ohne]] | ||
| + | <br> | ||
| + | * Enter your email address and click '''"Next"'''. | ||
| + | <br clear=all> | ||
| + | |||
| + | [[Datei:Mail-einrichten-outlook-macos-13.png|links|mini|ohne]] | ||
| + | <br> | ||
| + | * Outlook will try to determine the protocol automatically. | ||
| + | * Select '''"IMAP"''' if this does not happen automatically. | ||
| + | <br clear=all> | ||
| + | |||
| + | {| width="70%" style="background-color:yellow; border-style:dashed; border-width:3px; border-color:red; padding: 4px; " | ||
| + | | '''Microsoft Sync''' is a Microsoft feature that transmits and stores login data to Microsoft. This allows emails to be retrieved from any IMAP mailbox on Microsoft servers and sent from there to Outlook, for example. <span style="color:red">This gives Microsoft direct access to your mailbox and your login data!</span> This feature therefore violates our terms of use. | ||
| + | |} | ||
| + | |||
| + | [[Datei:Mail-einrichten-outlook-macos-12.png|links|mini|ohne]] | ||
| + | <br> | ||
| + | * Microsoft offers to retrieve emails with Microsoft Sync via the Microft servers - <span style="color:red">Do not select this option!</span> | ||
| + | * Instead, select '''"Synchronize directly with IMAP"'''. | ||
| + | <br clear=all> | ||
| + | |||
| + | [[Datei:Mail-einrichten-outlook-macos-10.png|links|mini|ohne]] | ||
| + | <br> | ||
| + | * Activate '''"Show advanced settings"'''. | ||
| + | <br clear=all> | ||
| + | |||
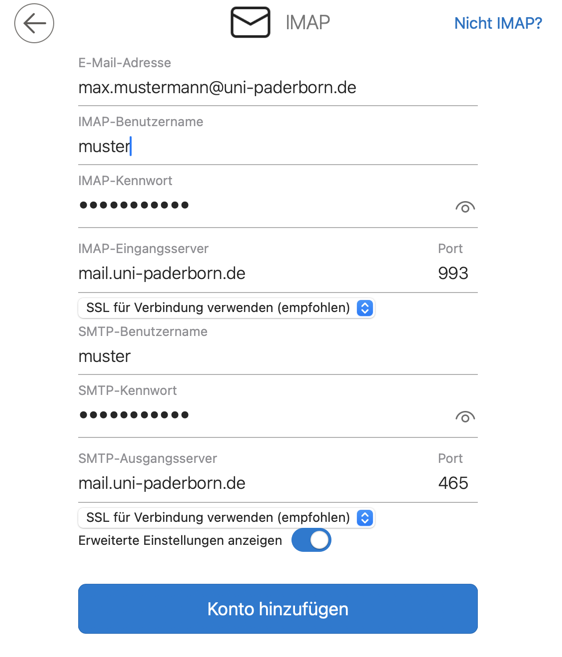
| + | Set up your mailbox with the following settings. | ||
| + | [[Datei:Mail-einrichten-outlook-macos-11.png|links|mini|ohne]] | ||
| + | <br> | ||
| + | * '''Email address:''' Your personal email address from which you want to send. | ||
| + | * '''IMAP user name:''' User name for your university account. | ||
| + | * '''IMAP password:''' Password for your university account. | ||
| + | * '''IMAP incoming server:''' <code>mail.uni-paderborn.de</code> | ||
| + | * '''Use SSL for connection''': Activate | ||
| + | <br> | ||
| + | * '''SMTP user name:''' User name for your university account. | ||
| + | * '''SMTP password:''' Password for your university account. | ||
| + | |||
| + | * '''SMTP outgoing server:''' <code>mail.uni-paderborn.de</code> | ||
| + | * '''Use SSL for connection''': Activate the checkbox | ||
| + | <br> | ||
| + | * Finally, click on '''"Add account"'''. | ||
| + | |||
| + | <br clear=all> | ||
| + | |||
| + | </bootstrap_panel> | ||
| + | </bootstrap_accordion> | ||
| + | |||
| + | == See also == | ||
| + | * [[Mail]] | ||
Aktuelle Version vom 30. Januar 2025, 21:56 Uhr
Die deutsche Version finden Sie auf der Seite Mail einrichten - Outlook (macOS)
Please note that Microsoft Sync is active in the new versions of Outlook. This allows Microsoft direct access to your mailbox and your login data. This function therefore violates our terms of use. Information on how to deactivate Microsoft Sync can be found in the course of the instructions. |
This instruction explains how to set up the IMAP mailbox of the University of Paderborn in Microsoft's email program Outlook on a device with the Apple macOS operating system.
What do I need to do?[Bearbeiten | Quelltext bearbeiten]
- Install Outlook
- Set up an email mailbox in Outlook
Step-by-step instructions[Bearbeiten | Quelltext bearbeiten]
- Open Outlook.
Add account[Bearbeiten | Quelltext bearbeiten]
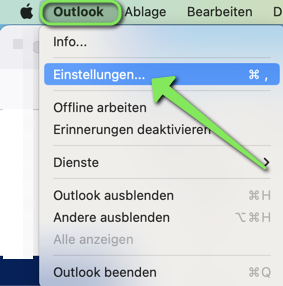
- Click on "Microsoft Outlook" in the menu bar.
- Then click on "Settings...".
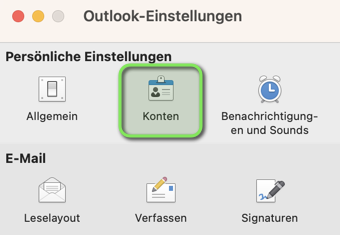
- Click on "Accounts".
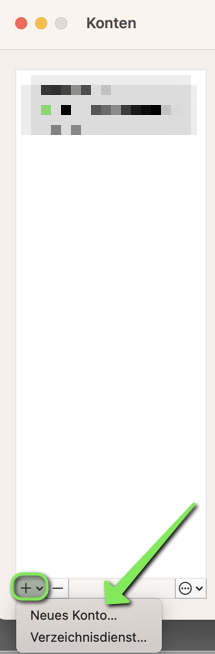
- Click on the
+at the bottom. - Then click on "New account...".
Set up an account[Bearbeiten | Quelltext bearbeiten]
Further info: Which mail address do you have?
As student or employe you have the following e-mail adresses:
- username@mail.uni-paderborn.de
- username@campus.uni-paderborn.de
- username@mail.upb.de
- username@campus.upb.de
Employes have additionally the following E-Mail-Adress:
- name.surname@uni-paderborn.de
- name.surname@upb.de
- Contact the ZIM for additional E-Mail-Aliases.
All aliases are available in the same mailbox. Choose one as you like for sending an receiving mails.
Outlook Legacy for macOS
These instructions refer to the classic design of Outlook on macOS.
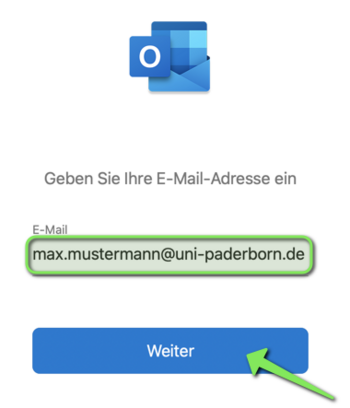
- Enter your email address.
- Then click "Next".

- Click "IMAP/POP".
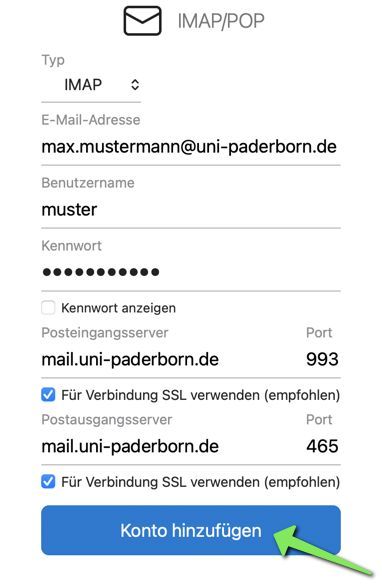
Select the following settings:

- Type: IMAP
- E-mail address: Your personal e-mail address from which you want to send.
- User name: User name for your university account.
- Password: Password for your university account.
- Incoming mail server:
mail.uni-paderborn.de - Use SSL for connection: Activate checkbox
- Outgoing mail server:
mail.uni-paderborn.de - Use SSL for connection: Activate checkbox
- Finally, click on "Add account".

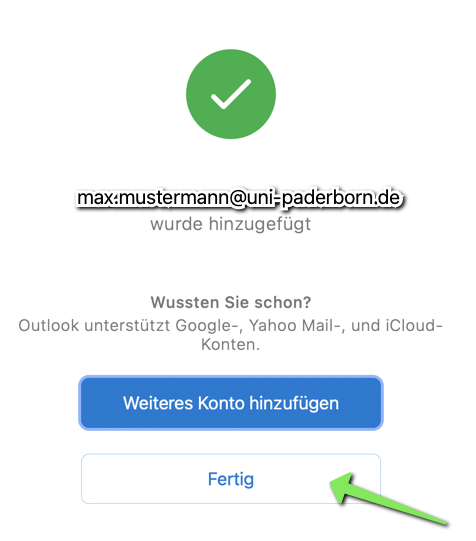
- Your email mailbox has been set up.
- Click Done".
New Outlook for macOS
For Outlook 16.42 or newer, there is a new design for Outlook. Microsoft calls this "New Outlook for macOS"

- Click "Add email account"

- Enter your email address and click "Next".
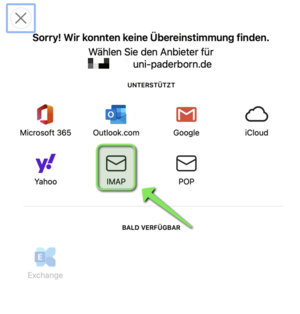
- Outlook will try to determine the protocol automatically.
- Select "IMAP" if this does not happen automatically.
| Microsoft Sync is a Microsoft feature that transmits and stores login data to Microsoft. This allows emails to be retrieved from any IMAP mailbox on Microsoft servers and sent from there to Outlook, for example. This gives Microsoft direct access to your mailbox and your login data! This feature therefore violates our terms of use. |
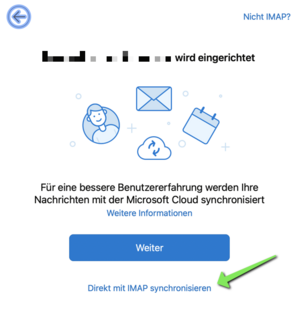
- Microsoft offers to retrieve emails with Microsoft Sync via the Microft servers - Do not select this option!
- Instead, select "Synchronize directly with IMAP".
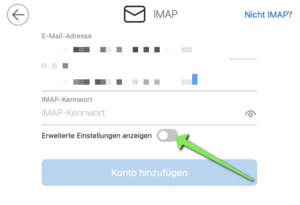
- Activate "Show advanced settings".
Set up your mailbox with the following settings.
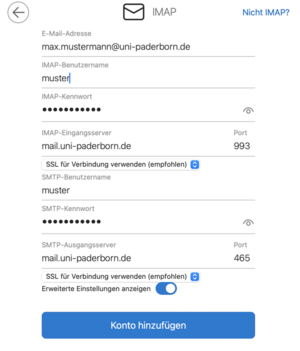
- Email address: Your personal email address from which you want to send.
- IMAP user name: User name for your university account.
- IMAP password: Password for your university account.
- IMAP incoming server:
mail.uni-paderborn.de - Use SSL for connection: Activate
- SMTP user name: User name for your university account.
- SMTP password: Password for your university account.
- SMTP outgoing server:
mail.uni-paderborn.de - Use SSL for connection: Activate the checkbox
- Finally, click on "Add account".


